Running Tests with the NUnit Visual Studio Adapter
Most .NET developers write code using Visual Studio, so it is convenient to be able to run and debug your NUnit tests from within Visual Studio. There are commercial products like TestDriven.NET, NCrunch and Resharper that can run your tests, but the NUnit Visual Studio Adapter is free and works in all current editions of Visual Studio.
Installing the NUnit Visual Studio Adapter
Visual Studio Extension
The easiest way to install the NUnit Visual Studio Adapter is as an extension. This has the advantage that it is always available and it will automatically update to the latest versions as they are released. The disadvantage is that every person on your team will need to install it.
To install, you can download the extension from the Visual Studio Gallery and double click the VSIX file to install it in all supported versions of Visual Studio.
The second option is to go to the Tools | Extensions and Updates menu in Visual Studio. From here, click on Online and search for nunit adapter. You are looking for the NUnit 3 Test Adapter and install it.
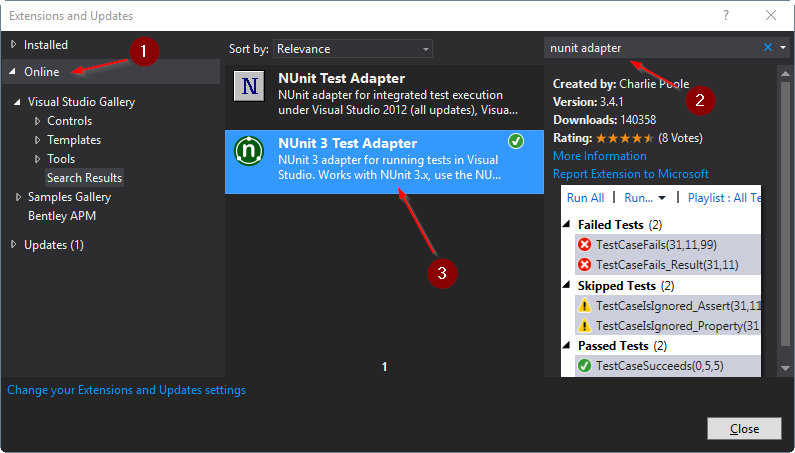
Notice there is an NUnit Test Adapter available too. That is the original adapter for running older NUnit 2 tests. If you have older tests, it is fine to install both NUnit test adapters side-by-side.
NuGet Package
The other option for installing the NUnit Visual Studio Adapter is as a NuGet package. This has the advantage that it becomes part of your solution and every developer will get it, but you must add it to every solution that needs it.
To install, right click on your test project in Visual Studio and click on Manage NuGet Packages...
Click on the Browse tab and search for nunit adapter. You are looking for NUnit3TestAdapter. Click it and install. Like the extension, there is also NUnitTestAdapter for running NUnit 2 tests.
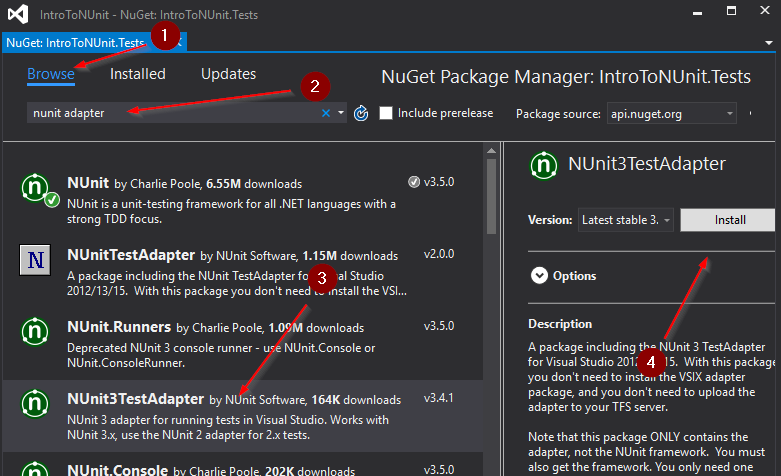
Note that you only have to install the adapter in one test project and it will be available for the entire solution.
Running Tests using the Test Explorer Window
You will usually run your tests using the Test Explorer Window. To open it, click the Test | Windows | Test Explorer menu.
Running Tests
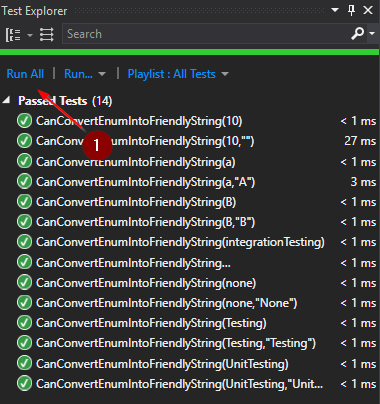
After you build your solution, Visual Studio will populate the Test Explorer Window. If you don't see any tests, check the output window for errors. To run tests, simply click the Run All button in the upper left. You will see your tests run as the progress bar updates and your tests turn green.
The Run... menu allows you to run failed tests, tests that have not been run before, etc. Right clicking on individual tests or groups of tests and clicking Run Selected Tests will run those tests.
Debugging Tests
Tests can be debugged from the Test Explorer Window. Add your breakpoints into your code and right click on individual tests or groups of tests, then click Debug Selected Tests.
Debugging and running tests is often easiest from the source code you are working on. We'll cover that next.
Running Tests from within the Source Code Editor
The easiest way to run or debug tests from within the source code editor is to use the key bindings.
- Ctrl R, A - Run All Tests
- Ctrl R, Ctrl A - Debug All Tests
- Ctrl R, T - Run the tests at your cursor
- Ctrl R, Ctrl T - Debug the tests at your cursor
Running the tests where your cursor is can be very useful since it runs the tests you are currently working on. When the cursor is in a method, it will run that method, if it is in a class, it will run all tests in the class.
Visual Studio has trouble with multiple tests created using the TestCase attribute or other data attributes. Using the key-bindings while in these methods will run all tests in the class.
Code Lens
If your version of Visual Studio includes Code Lens, your tests will also have a small icon on the left of the code lens that indicates if the test passed, failed, was ignored or hasn't been run. Clicking that icon brings up information on the last test run and allows you to run or debug the test.

Other Features
Grouping Tests
By default, Visual Studio groups tests in the Test Explorer Window by their outcome; pass, fail, etc. You can also group by Class, Duration, Traits or Project. To group your tests, either right-click on a group and select Group By or use the dropdown at the top left of the window.
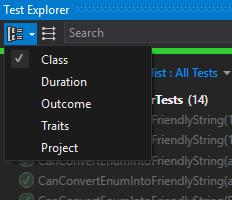
The Traits group maps to NUnit's Category Attribute which allows you to group your tests based on the categories you assign them.
Running x86 or x64 Tests
If your tests are compiled x86 or x64 instead of AnyCpu, you must set the processor architecture to run your tests under. To do so, click on Test | Test Settings | Default Processor Architecture menu and select X86 or X64.
Playlists
If you have a group of tests that you are always running, you should create a playlist for them. To do so, select the tests that you want to include in the Test Explorer Window, then right click and select Add to Playlist | New Playlist. Once you do so, you can filter the tests that are displayed and run but selecting the playlist from the dropdown at the top right.
